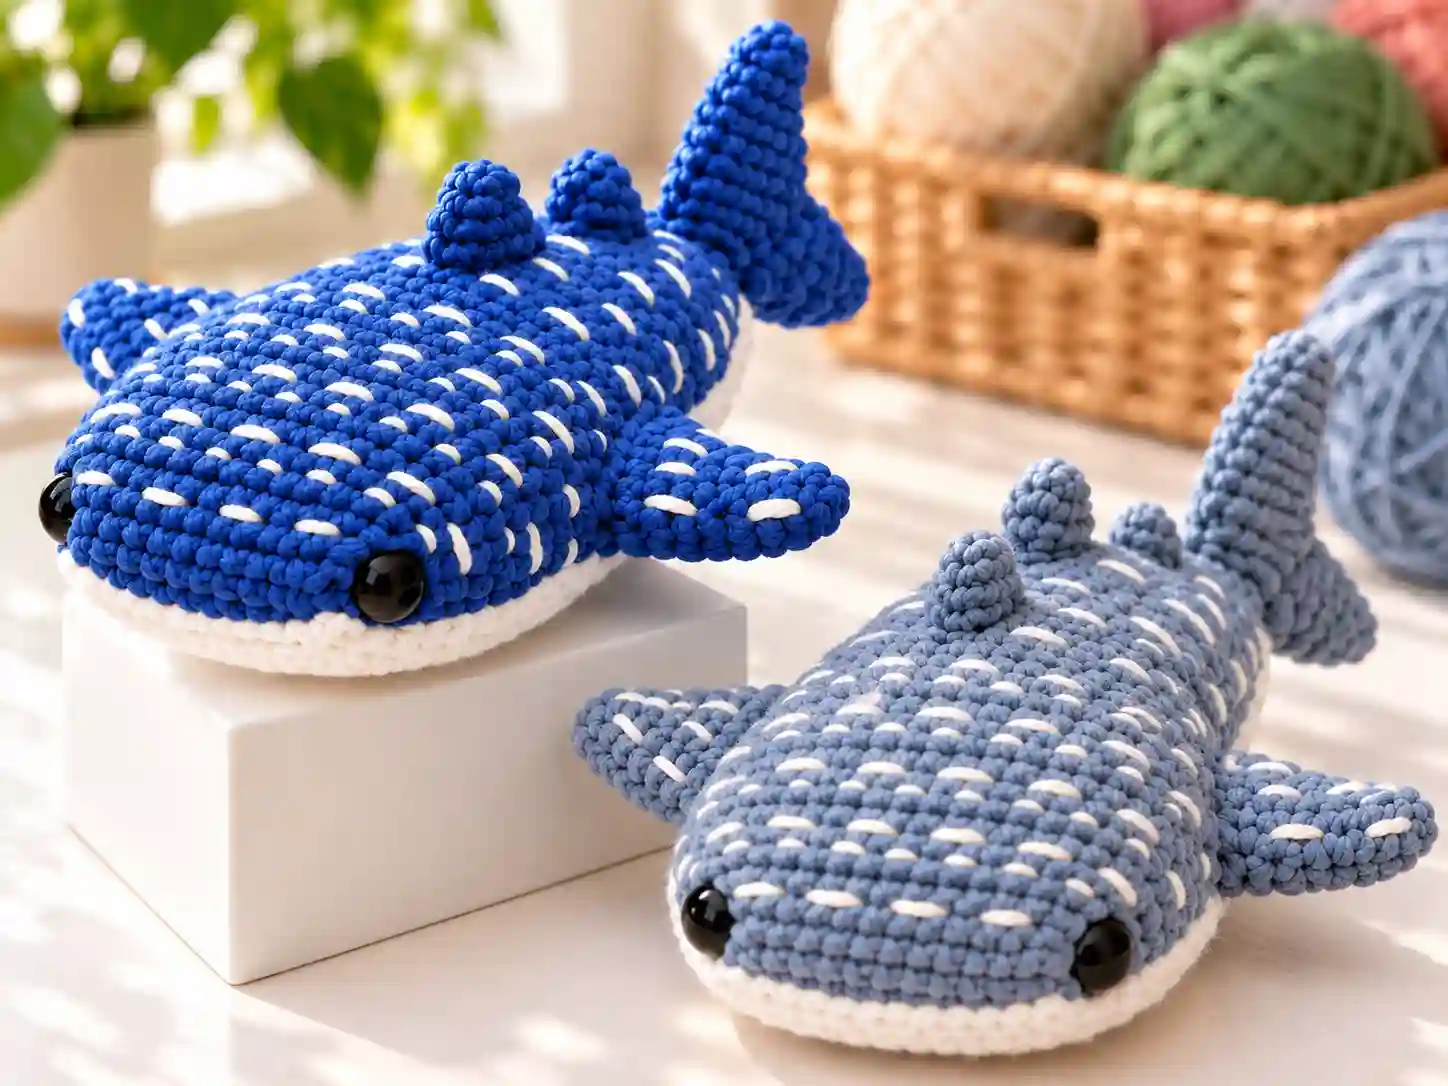
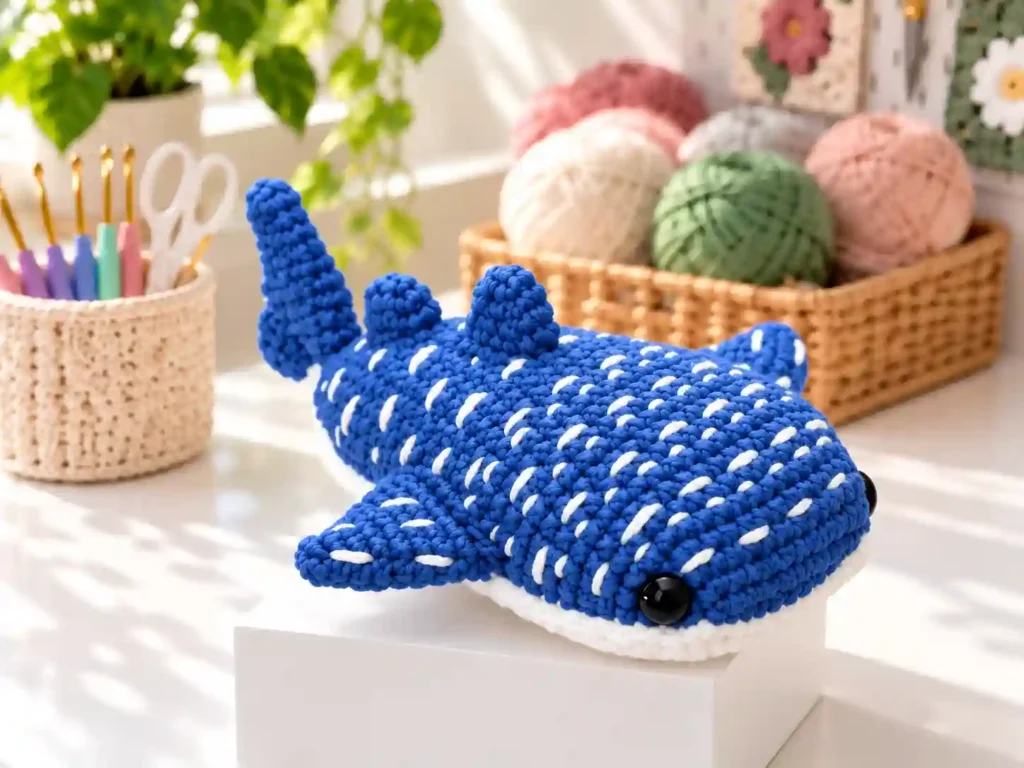
This free whale shark amigurumi pattern turns simple single crochet stitches into a calm, wide-eyed ocean companion. With its long blue body, pale belly, spotted back, and little fins, it is a satisfying project for anyone who enjoys making soft crochet animals with plenty of personality.
The whale shark shape works beautifully in amigurumi because it does not need complicated shaping to feel recognizable. A foundation-chain start creates the longer, oval body, while carefully placed increases and decreases form the broad head and tapered tail. The result is a huggable sea creature that looks lovely on a shelf, in a nursery, or beside a collection of crochet ocean animals.
Why You’ll Love This Crochet Project
- The body begins with a foundation chain, giving the whale shark its natural elongated shape.
- Most of the project uses single crochet, so the stitches stay dense and the stuffing remains hidden.
- The white belly is worked flat in rows, then sewn onto the body for a clean contrast.
- Embroidered spots add the classic whale shark look without extra crocheted pieces.
- It makes a thoughtful handmade gift for ocean lovers, children’s rooms, and crochet collections.
Finished Size
The finished whale shark measures approximately 7 inches (18 cm) long. Your final size may vary with yarn brand, hook size, personal tension, and whether you crochet with yarn over or yarn under.
Materials You’ll Need
- Worsted-weight, 4-ply yarn in blue and white. In the UK, use Aran weight; in Australia or New Zealand, use 8-ply yarn.
- G (4 mm) crochet hook
- 12 mm black safety eyes
- Fiberfill or your preferred amigurumi stuffing
- Bent-tip tapestry needle
- Scissors
- Stitch marker
- Straight pins
Yarn Information
A smooth worsted-weight acrylic or acrylic-blend yarn is a dependable choice for this project because it shows stitch definition clearly and holds its shape after stuffing. Use blue for the body, fins, and tail, and white for the belly and embroidered markings.
If you substitute yarn, choose another worsted-weight option with a similar thickness. A cotton yarn will create a firmer, more structured toy, while a softer acrylic blend will feel squishier. Changing to a lighter or heavier yarn will change the finished size, so keep the hook and stuffing proportionate to the yarn you select.
Crochet Hook
This pattern calls for a G (4 mm) crochet hook. A hook that creates a close fabric is important for amigurumi; if you can see stuffing between stitches, go down a hook size.
Crochet Abbreviations
This pattern uses U.S. crochet terminology.
- sc – single crochet
- st/sts – stitch/stitches
- sl st – slip stitch
- dec – decrease: join the next two stitches together
- inc – increase: work two single crochet stitches in the next stitch
- R – round
- rep – repeat
- ** – repeat the instructions between the asterisks the number of times indicated
Pattern Notes
- All body and fin rounds are worked continuously in a spiral; do not join at the end of each round unless instructed.
- Use a stitch marker to mark the first stitch of each round.
- You may begin pieces with a magic ring or the chain-2 method; both produce the same result.
- Keep the right side of the stitches facing outward while working in the round.
- Yarn under creates a tighter amigurumi fabric. Yarn over is also fine, but it may make the whale shark slightly larger.
- For color changes, insert the hook into the last stitch with the old color, pull up a loop, then use the new color to pull through the remaining loops on the hook.
- Use a whipstitch to sew pieces together unless otherwise noted.
Free Whale Shark Amigurumi Pattern
Part 1: Body
Use blue yarn. The first round is worked around both sides of a foundation chain to create an oval base.
- R1: Ch 13. Starting in the second chain from the hook, sc 12. Rotate the work 180 degrees, then work 12 sc into the front loops of the beginning chain. (24 sts)
- R2: Inc, sc 9, inc 3, sc 9, inc 2. (30 sts)
- R3: Sc in each st around. (30 sts)
- R4: Sc 1, inc, sc 9, *sc 1, inc* rep 3 times, sc 9, *sc 1, inc* rep 2 times. (36 sts)
- R5: Sc in each st around. (36 sts)
- R6: Sc 2, inc, sc 9, *sc 2, inc* rep 3 times, sc 9, *sc 2, inc* rep 2 times. (42 sts)
- R7–14: Sc in each st around. (42 sts per round; 8 rounds total)
Pause after Round 14 and insert the 12 mm safety eyes between Rounds 3 and 4 at the head end. Place them 14 stitches apart. Count 14 stitches from the first eye opening before securing the second eye.
- R15: Dec, sc 19, dec, sc 19. (40 sts)
- R16: Dec, sc 18, dec, sc 18. (38 sts)
- R17: Sc in each st around. (38 sts)
- R18: Dec, sc 17, dec, sc 17. (36 sts)
- R19: Sc in each st around. (36 sts)
- R20: Dec, sc 16, dec, sc 16. (34 sts)
- R21: Sc in each st around. (34 sts)
- R22: Dec, sc 15, dec, sc 15. (32 sts)
- R23: Dec, sc 14, dec, sc 14. (30 sts)
- R24: Sc in each st around. (30 sts)
- R25: Dec, sc 13, dec, sc 13. (28 sts)
- R26: Sc in each st around. (28 sts)
- R27: Dec, sc 12, dec, sc 12. (26 sts)
- R28: Sc in each st around. (26 sts)
Begin adding fiberfill at this point. Stuff gently rather than packing it tightly, since the whale shark looks best with a slightly flattened, soft body. Continue stuffing as you complete the remaining rounds.
- R29: Dec, sc 11, dec, sc 11. (24 sts)
- R30: *Sc 2, dec* rep 6 times. (18 sts)
- R31: Sc in each st around. (18 sts)
- R32: *Sc 1, dec* rep 6 times. (12 sts)
- R33: Sc in each st around. (12 sts)
- R34: Dec 6 times. (6 sts)
Fasten off, leaving a yarn tail for sewing. Thread the tail through the remaining stitches, pull gently to close the opening, and secure the end inside the body.
Part 2: Belly
Use white yarn. The belly is worked flat in turned rows, not in rounds.
- Row 1: Ch 13, sc 12 starting in the second chain from the hook, ch 1, turn. (12 sts)
- Row 2: Inc, sc 10, inc, ch 1, turn. (14 sts)
- Row 3: Sc 1, inc, sc 10, inc, sc 1, ch 1, turn. (16 sts)
- Row 4: Sc in each st across, ch 1, turn. (16 sts)
- Row 5: Inc, sc 14, inc, ch 1, turn. (18 sts)
- Rows 6–8: Sc in each st across. (18 sts per row; 3 rows total)
- Row 9: Inc, sc 16, inc, ch 1, turn. (20 sts)
- Rows 10–14: Sc in each st across. (20 sts per row; 5 rows total)
- Row 15: Dec, sc 16, dec, ch 1, turn. (18 sts)
- Row 16: Sc in each st across, ch 1, turn. (18 sts)
- Row 17: Dec, sc 14, dec, ch 1, turn. (16 sts)
- Rows 18–19: Sc in each st across. (16 sts per row; 2 rows total)
- Row 20: Dec, sc 12, dec, ch 1, turn. (14 sts)
- Rows 21–22: Sc in each st across. (14 sts per row; 2 rows total)
- Row 23: Dec, sc 10, dec, ch 1, turn. (12 sts)
- Rows 24–25: Sc in each st across. (12 sts per row; 2 rows total)
- Row 26: Dec, sc 8, dec, ch 1, turn. (10 sts)
- Rows 27–28: Sc in each st across. (10 sts per row; 2 rows total)
- Row 29: Dec, sc 6, dec, ch 1, turn. (8 sts)
- Row 30: Sc in each st across, ch 1, turn. (8 sts)
- Row 31: Dec, sc 4, dec, ch 1, turn. (6 sts)
- Row 32: Dec, sc 2, dec, ch 1, turn. (4 sts)
- Row 33: Sc in each st across, ch 1, turn. (4 sts)
- Row 34: Dec 2 times. (2 sts)
Fasten off, leaving a long tail for sewing.
Part 3: Embroidered Back Details
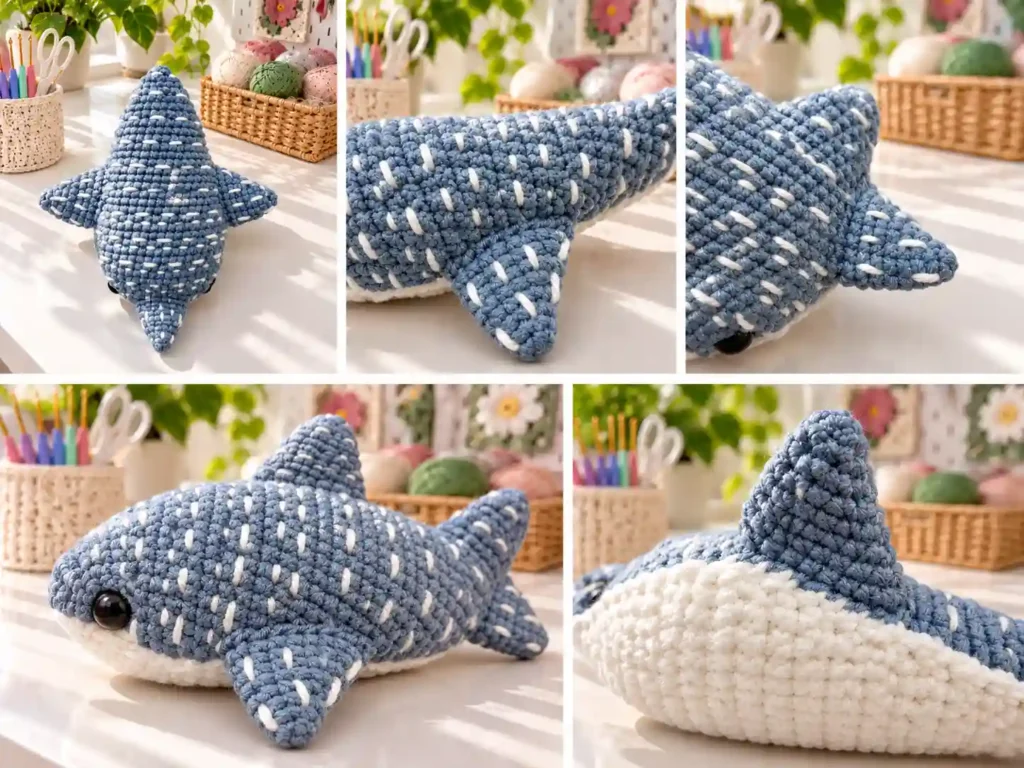
Use white yarn and a tapestry needle to embroider the signature markings on the blue back. Work horizontal straight stitches across the body. Make each large white stitch two single crochet stitches wide, leaving one stitch between stitches. Space each row of large stitches three rounds apart.
After completing the large spots, add smaller white stitches beneath the second through fifth rows of large markings. These smaller stitches should be one stitch wide, with one stitch between them. Weave the embroidery tails securely into the body when finished.
Part 4: Side Fins
Make 2 using blue yarn. Do not stuff the fins.
- R1: Ch 2, sc 4 in the second chain from the hook. (4 sts)
- R2: Inc, sc 2, inc. (6 sts)
- R3: Inc, sc 4, inc. (8 sts)
- R4: Inc, sc 6, inc. (10 sts)
- R5: Inc, sc 8, inc. (12 sts)
- R6: Inc, sc 10, inc. (14 sts)
- R7: Inc, sc 12, inc. (16 sts)
- R8: Inc, sc 14, inc. (18 sts)
- R9: Inc, sc 16, inc. (20 sts)
Fasten off each fin, leaving a long sewing tail. Embroider a few white stitches across the top of each fin to echo the markings on the body.
Part 5: Back Fins
Use blue yarn. Make one small back fin and one large back fin. Do not stuff either piece.
Small back fin:
- R1: Ch 2, sc 4 in the second chain from the hook. (4 sts)
- R2: Inc, sc 2, inc. (6 sts)
- R3: Inc, sc 4, inc. (8 sts)
- R4: Inc, sc 6, inc. (10 sts)
Large back fin:
- R1: Ch 2, sc 4 in the second chain from the hook. (4 sts)
- R2: Inc, sc 2, inc. (6 sts)
- R3: Inc, sc 4, inc. (8 sts)
- R4: Inc, sc 6, inc. (10 sts)
- R5: Inc, sc 8, inc. (12 sts)
Fasten off both fins, leaving long tails for sewing.
Part 6: Tail Fins
Use blue yarn. The tail is made from two flat pieces that are sewn together, then attached to the body. Do not stuff either piece.
Small tail fin piece:
- R1: Ch 2, sc 4 in the second chain from the hook. (4 sts)
- R2: Inc, sc 2, inc. (6 sts)
- R3: Inc, sc 4, inc. (8 sts)
- R4: Inc, sc 6, inc. (10 sts)
- R5: Inc, sc 8, inc. (12 sts)
- R6: Dec, sc 8, dec. (10 sts)
Large tail fin piece:
- R1: Ch 2, sc 4 in the second chain from the hook. (4 sts)
- R2: Inc, sc 2, inc. (6 sts)
- R3: Sc in each st around. (6 sts)
- R4: Inc, sc 4, inc. (8 sts)
- R5: Inc, sc 6, inc. (10 sts)
- R6: Sc in each st around. (10 sts)
- R7: Inc, sc 8, inc. (12 sts)
- R8: Inc, sc 10, inc. (14 sts)
- R9: Dec, sc 10, dec. (12 sts)
- R10: Dec, sc 8, dec. (10 sts)
- R11: Dec, sc 6, dec. (8 sts)
Fasten off both pieces, leaving long tails for sewing.
Assembly
- Place the white belly piece along the underside of the blue body. Use straight pins to hold it in position.
- Sew around the entire outer edge of the belly with the long yarn tail, then knot and weave in the end.
- Pin one side fin to each side of the body, roughly over Rounds 12 to 22 and just above the white belly. Sew the lower edge of each fin to the outer edge of the belly piece.
- Position the large back fin over approximately Rounds 18 to 24 on the top of the body. Pin, sew, and secure the tail.
- Place the small back fin over approximately Rounds 26 to 31. Pin, sew, and weave in the yarn end.
- Attach the large tail fin over approximately Rounds 33 and 34 at the narrow end of the body.
- Hold the small tail fin against the large tail fin with its decrease edge facing downward. Sew the opening of the small piece to the bottom of the large piece, then secure and hide the yarn tails.
Finishing Touches
Check the placement of every fin before making final knots. A few straight pins make a noticeable difference, especially when matching the two side fins. Once everything is secure, squeeze the body gently and redistribute the stuffing if any area feels uneven.
Weave all remaining tails deeply into the body or fin pieces so they cannot work loose with handling. Avoid trimming tails too close to the surface, particularly on a toy that will be hugged or played with.
Crochet Tips
- Count stitches at the end of every round, especially during the increase and decrease sections.
- If the oval base looks uneven, the increases may not be sitting at the corners of the foundation chain. Keep the same number of increases, but shift them slightly so they follow your natural corners.
- Keep stuffing light around the middle of the body to preserve the whale shark’s gently flattened shape.
- Use pins before sewing the belly and fins; it is much easier to adjust placement before the yarn is secured.
- For embroidery, use shorter strands of white yarn to prevent tangling and fraying.
Variations
- Use gray, navy, teal, or pale aqua yarn for a different ocean palette.
- Skip the embroidered spots for a simpler, minimalist whale-inspired toy.
- Use a slightly smaller hook with the same yarn for a denser, firmer fabric.
- Make the belly in a soft cream shade instead of bright white for a warmer, vintage look.
- Add a small crocheted starfish or shell as a separate companion piece for an ocean-themed display.
Common Problems and Troubleshooting
The body looks twisted or uneven
This often happens when the first-round increases are not placed at the edges of the foundation chain. Check that you worked 12 single crochet stitches on each side of the chain. If the count is correct, adjust the increase positions slightly so they follow the corners of your own tension.
The stuffing shows through the stitches
Switch to a smaller hook, use a smoother worsted-weight yarn, or work with slightly tighter tension. Avoid overstuffing, which stretches the fabric and makes gaps more visible.
The stitch count is wrong
Stop at the end of the round and count carefully. Compare the round against the pattern, then locate the first place where the count changed. In amigurumi, a missing increase or an extra single crochet is usually easier to fix immediately than several rounds later.
How to Use the Finished Crochet Project
- Display it with other crochet ocean animals on a shelf or nursery dresser.
- Package it as a handmade baby-shower or birthday gift.
- Add it to an ocean-themed play set with fish, turtles, or jellyfish.
- Use it as a soft decorative accent in a coastal-style room.
- Make it as a relaxing scrap-friendly project when you have small amounts of blue and white worsted yarn.
Care Instructions
Spot-clean the finished whale shark with a damp cloth and mild soap when needed. If a deeper clean is necessary, hand-wash it gently in cool water, press out excess moisture with a towel, and air-dry flat. Reshape the body and fins while damp, and keep it away from direct heat.
Frequently Asked Questions
Can a beginner make this whale shark?
Yes. The project relies mainly on single crochet, increases, decreases, and sewing. The foundation-chain start and embroidered details may take a little practice, but they are manageable with patience.
What yarn works best?
A smooth worsted-weight yarn in blue and white is ideal. Choose a yarn that creates a firm fabric with your 4 mm hook so the stuffing stays concealed.
Can I use a different hook size?
You can, but a smaller hook generally gives tighter amigurumi fabric. A larger hook will create a looser toy and may allow stuffing to show between stitches.
Can I make the whale shark larger or smaller?
Changing yarn weight and hook size is the simplest way to adjust the size. There is no reliable formula for simply multiplying every round, so test a small adjustment before committing to a large version.
Do I have to use safety eyes?
Safety eyes give the whale shark a bright, polished look, but embroidered eyes are a good alternative for a toy intended for a very young child. Attach safety eyes securely before the body is fully stuffed.
How do I keep the embroidered spots neat?
Mark the spacing lightly with pins or stitch markers before embroidering. Keep each straight stitch the same width and use consistent spacing between rows.
How should I wash the finished project?
Spot-cleaning is best for everyday care. For a more thorough wash, hand-wash gently, reshape the toy, and let it dry completely away from direct heat.
Conclusion
This free whale shark amigurumi pattern is a lovely way to bring a little ocean-themed charm to your crochet table. Try it in classic light blue, experiment with a deeper sea-blue shade, or make a whole pod of gentle whale sharks in different sizes. Once the belly, fins, and spots are in place, you will have a soft handmade friend with plenty of quiet underwater character.