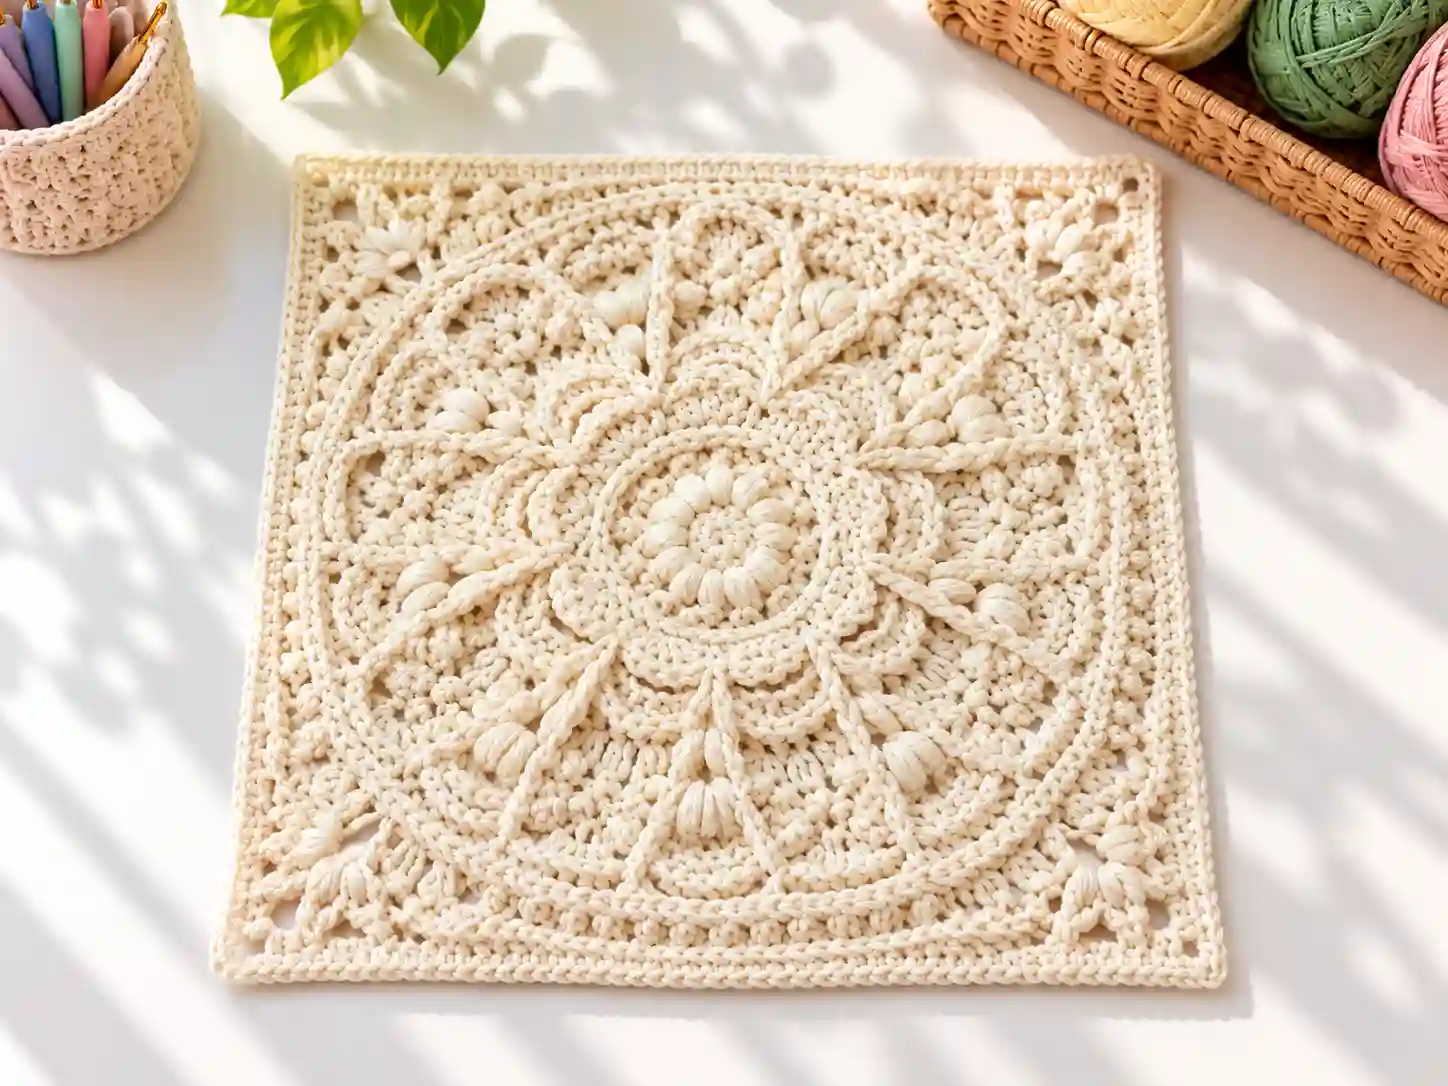
There’s something magical about a granny square that feels like it came from another era. The Vintage Floral Afghan Granny Square Free Crochet Pattern brings together intricate texture, elegant floral motifs, and sophisticated stitchwork to create a block that’s equally at home in a sampler blanket or as a standalone statement piece.
This elegant granny square pattern features a lush floral center surrounded by dimensional petals and finished with a refined border that showcases picot details and post stitches. The result is an intricate granny square that looks stunning in solid colors or subtle tonal variations.
While this textured granny square crochet pattern challenges intermediate crocheters, the rewarding construction and beautiful finished result make every stitch worthwhile. You’ll work through a variety of techniques including puff stitches, clusters, front and back post work, and delicate picot edging.
Why You’ll Love This Pattern
- Creates a substantial 12-inch block perfect for afghans and throws
- Showcases beautiful texture that photographs wonderfully
- Works up beautifully in worsted weight yarn
- Suitable for heirloom-quality blankets and gifts
- Adaptable to different color schemes for varied moods
- Builds confidence with advanced stitch techniques
Finished Size
Each completed square measures approximately 12 inches by 12 inches after blocking. The substantial size makes it ideal for creating blankets without needing an excessive number of squares.
Materials You’ll Need
- 5mm (I) crochet hook, or size needed to achieve gauge
- 250-275 yards of #4 worsted weight yarn in your chosen color
- Yarn needle for weaving ends
- Sharp scissors
- Blocking board and pins (optional but recommended for best results)
- Stitch markers (helpful for tracking rounds)
Yarn Information
This intricate granny square pattern was designed with #4 worsted weight yarn to achieve the stated measurements and texture definition. A smooth worsted weight with good stitch definition works best here, as the pattern relies heavily on textured stitches that need to show clearly.
Solid or semi-solid colors showcase the intricate granny square pattern details far better than variegated yarns, which can obscure the beautiful texture work. If you’re planning a multicolor blanket, consider using different colors for different squares rather than changing colors within a single square.
Switching to a lighter weight yarn will produce a smaller, more delicate square, while bulky weight will create a larger block. Keep in mind that yarn changes will affect both finished size and yardage requirements.
Crochet Hook Size
A 5mm (I) hook is recommended for this pattern. However, hook size should always be adjusted to match your personal tension and the specific yarn you’ve chosen. If your square measures significantly smaller or larger than 12 inches after completing round 18, consider adjusting your hook size accordingly.
Crochet Abbreviations (US Terminology)
This vintage floral square crochet pattern uses standard US crochet terminology throughout.
- ch = chain
- sl st = slip stitch
- sc = single crochet
- hdc = half double crochet
- dc = double crochet
- tr = treble crochet
- BPsc = back post single crochet
- BPdc = back post double crochet
- BPhdc = back post half double crochet
- FPsc = front post single crochet
- FPdc = front post double crochet
- FPtr = front post treble crochet
- FPhdc = front post half double crochet
- BLO = back loop only
- st(s) = stitch(es)
- sp(s) = space(s)
- yo = yarn over
Special Stitches:
- Picot sc: Insert hook, yo, pull up a loop, [yo, draw through 1 loop] 3 times to create a ch 3, then yo and draw through last 2 loops on hook. Gently push the picot toward the front of your work when complete.
- 3dc cluster: Work 3 double crochet stitches together in the same stitch
- Small puff stitch: [Yo, pull up a loop] 3 times in same stitch, yo, pull through 6 loops, yo, pull through final 2 loops
- Puff stitch: [Yo, pull up a loop] 4 times in same stitch, yo, pull through 8 loops, yo, pull through final 2 loops
- 2tr cluster: Work 2 treble crochet stitches together in same stitch or space
- tr2tog: Treble crochet 2 together, worked over adjacent stitches or clusters
Pattern Notes
This boho floral square crochet pattern is worked in continuous joined rounds from the center outward. The square may not lie completely flat during construction, particularly through the middle rounds, but should flatten nicely by round 18 and with light blocking at the end.
Each round is joined with a slip stitch to the first stitch of that round unless otherwise noted. Turning chains do not count as stitches in this pattern. Pay close attention to stitch counts, especially in the corner sections of later rounds.
The pattern features repeating sections within rounds. Once you complete the first repeat of a round, the remaining repeats should feel intuitive. Read each round completely before beginning, and work one comma or instruction at a time if you find yourself getting lost.
Vintage Floral Afghan Granny Square Free Crochet Pattern
Round 1: Create a magic circle, work 6 sc into the ring, join with sl st to first sc. (6 sc)
Round 2: Ch 1, working in BLO only, 2 sc in each st around, join with sl st to first st. (12 sc)
Round 3: Ch 1, small puff stitch, ch 1, skip next st; repeat from around, join with sl st to first small puff. (12 small puffs, 12 ch-1 spaces)
Round 4: Ch 1, picot sc in first st, sc in next st, picot sc in next st, sc in next st; repeat from around, join with sl st to first picot sc. (12 picot sc, 12 sc)
Round 5: Ch 1, sc in first st, 2 sc in next st, sc in next st, 2 sc in next st; repeat from around, join with sl st to first sc. (18 sc)
Round 6: Ch 1, BPsc around each sc from previous round, join with sl st to first BPsc. (18 BPsc)
Note: Your work will begin to cup at this stage. This is normal and will resolve in later rounds.
Round 7: Skip join st, skip next st, 5 dc in next st, skip next st, sl st in next st; repeat from around, final sl st serves as join. (9 shells of 5 dc each)
Turn work so wrong side faces you.
Round 8: Ch 5, sl st around the BPsc post closest to where you placed your last sl st; repeat from around, final sl st serves as join. (9 ch-5 spaces, 9 sl sts)
Turn work back to right side facing.
Round 9: Sl st into ch-5 space, (hdc, 2 dc, 3 tr, 2 dc, hdc, sl st) all in same ch-5 space; repeat from around, final sl st serves as join. (9 petals created)
Round 10: Ch 1, BPdc around next 3 sts, BPhdc around next 3 tr, BPdc around next 3 sts, skip 2 sl sts; repeat from around each petal section, join with sl st to first BPdc. (54 BPdc, 27 BPhdc)
Round 11: Ch 1, FPtr in sl st between first two petals from round 7, skip next st, BPhdc around next 7 sts, skip next st, (FPtr, ch 1, FPtr) in round 7 sl st between next two petals; repeat from around, omitting final FPtr, join with sl st to first FPtr. (9 petals of 7 sts each, 18 FPtr, 9 ch-1 spaces)
Your square should begin lying flatter after this round.
Round 12: Ch 1, FPdc around FPtr, ch 1, skip 2 sts, [3dc cluster, ch 1] 3 times in next st, skip 2 sts, FPdc around next FPtr, ch 1, puff stitch in ch-1 space, ch 1, FPdc around next FPtr; repeat from around, omitting final FPdc, join with sl st to first FPdc. (18 FPdc, 9 puff stitches, 27 clusters of 3 dc)
Round 13: Ch 1, FPdc around FPdc, [sc in ch-1 space, picot sc on top of 3dc cluster] 3 times, sc in ch-1 space, FPdc around FPdc, skip st, (puff stitch, ch 1, puff stitch) in top of puff stitch from previous round, skip st; repeat from around, join with sl st to first FPdc. (18 FPdc, 36 sc, 27 picot sc, 18 puff stitches)
Round 14: Ch 1, FPsc around FPdc, [picot sc in next st, sc in next st] 3 times, picot sc in next st, FPsc around FPdc, skip to ch-1 space between puff stitches, 7 hdc in ch-1 space; repeat from around, join with sl st to first FPsc. (18 FPsc, 36 picot sc, 27 sc, 9 hdc petals)
Some puckering may occur here. This will be corrected in upcoming rounds.
Round 15: Ch 1, FPhdc around FPsc, [sc in next st, picot sc in next st] 3 times, sc in next st, FPhdc around FPsc, BPdc around next 7 hdc sts; repeat from around, join with sl st to first FPhdc. (18 FPhdc, 9 BPdc petals, 36 sc, 27 picot sc)
Round 16: Ch 1, FPhdc around FPhdc, skip 3 sts, 7 dc in next st, skip 3 sts, FPhdc around FPhdc, BPsc around next 7 sts; repeat from around, join with sl st to first FPhdc. (144 sts total)
Round 17: Ch 1, hdc in FPhdc, BPhdc around next 7 sts, hdc in FPhdc, hdc in next 7 sts; repeat from * around, join with sl st to first hdc. (144 hdc)
Round 18: Ch 1, BPsc in each st around, join with sl st to first BPsc. (144 BPsc)
At this point, your project should be noticeably flattening out.
Round 19: Ch 1, [sc in next st, picot sc in next st] 6 times, sc in next st, hdc in next st, (3dc cluster, ch 1) in next st, skip st, (3dc cluster, ch 1) in next st, skip st, (tr, ch 1, tr, ch 1) in next st, skip st, (3dc cluster, ch 1) in next st, skip st, 3dc cluster in next st, hdc in next st, [sc in next st, picot sc in next st] 12 times, sc in next st, hdc in next st, (3dc cluster, ch 1) in next st; repeat from around, ending final side with (tr, ch 1, tr, ch 1) in next st, skip st, (3dc cluster, ch 1) in next st, skip st, 3dc cluster in next st, hdc in next st, [sc in next st, picot sc in next st] 6 times, join with sl st to first sc. (Each side: 4 clusters of 3dc, 2 hdc, 2 tr, 13 sc, 12 picot sc)
Round 20: Ch 1, sc in next 12 sts, skip st, 5 dc in hdc, sc in ch-1 space between 3dc clusters from previous round, skip next ch-1 space, work (2tr cluster, ch 2, 2tr cluster, ch 2, 2tr cluster, ch 2, 2tr cluster) in next ch-1 space, sc in ch-1 space between 3dc clusters, 5 dc between hdc and sc sts from previous round, skip 2 sts, sc in next 22 sts; repeat from around, omitting 12 sc at end of final repeat, join with sl st to first sc. (Each side: 4 tr2tog, 2 shells of 5 dc, 24 sc)
Corner Note: The tr2tog stitches in round 21 are worked around the tr stitches and into the corner ch-1 space from round 19 (two rounds below). This creates a tighter, more defined corner. The two legs of each tr2tog are worked over and around the 2tr clusters from round 20, effectively sandwiching them for dimensional petal shaping.
Round 21: Ch 1, BPsc around next 10 sts, BPhdc around next 7 sts, BPdc around next sc, work tr2tog around first tr2tog from previous round by working one leg on the tr from round 19 (two rounds below) and one leg in the ch-1 space from round 19, 3 sc in first ch-2 space between 2tr clusters from previous round, work tr2tog into the ch-1 space from round 19 and around second 2tr cluster from previous round, (2 hdc, ch 2, 2 hdc) in second ch-2 space from previous round, tr2tog into ch-1 space from round 19 and around third 2tr cluster from previous round, 3 sc in third ch-2 space, tr2tog around last 2tr cluster from previous round by working first leg in ch-1 space from round 19 and second leg around tr from round 19, BPdc around sc, BPhdc around next 7 sts, BPsc around next 18 sc; repeat from around, omitting 10 BPsc on final repeat, join with sl st to first BPsc. (Each side: 18 BPsc, 14 BPhdc, 2 BPdc, 4 tr2tog, 6 sc, 4 hdc)
Round 22: Ch 1, sc in next 17 sts, hdc in next 3 sts, sc in next 5 sts, (2 sc, ch 1, 2 sc) in ch-2 corner space, sc in next 5 sts (note: the first of these 5 stitches resembles a chain, so work carefully to catch it), hdc in next 3 sts, sc in next 32 sts; repeat from around, omitting 17 sc on final repeat, join with sl st to first sc. (Each side: 46 sc, 6 hdc)
Fasten off and weave in all ends thoroughly.
Assembly Instructions
If you’re creating a blanket from multiple squares, arrange your completed vintage floral afghan granny squares in your desired layout before joining.
- Block each square to 12 inches square before joining for uniform sizing
- Place squares with right sides together or wrong sides together depending on whether you want a visible seam or flat join
- Use a yarn needle and matching yarn to whip stitch or mattress stitch squares together
- Work from one corner outward, keeping tension even to prevent puckering
- Weave in all joining ends securely on the wrong side
Finishing Touches
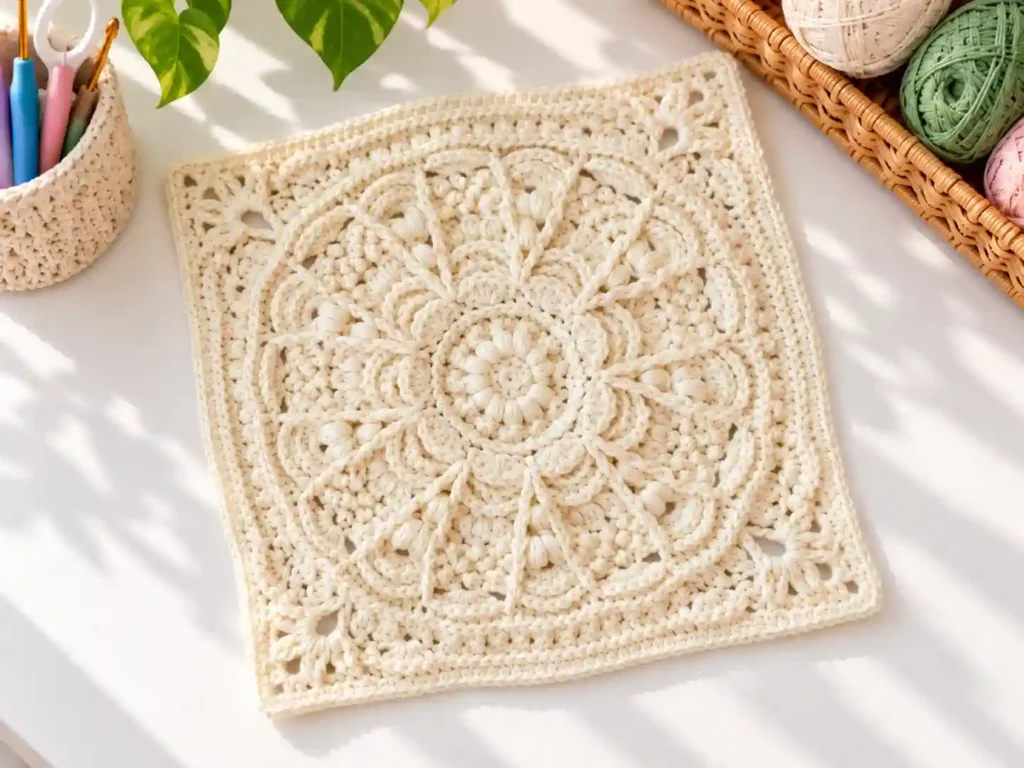
Light blocking makes a noticeable difference in the final appearance of this complex granny square. Pin your completed square to a blocking board, gently stretching it to 12 inches in both directions. Mist with water or use steam blocking, then allow to dry completely before removing pins.
Take time to weave in every end thoroughly, as the textured nature of this crochet flower mandala throw square means ends can work loose with use if not secured properly.
Crochet Tips for Success
- Count stitches at the end of each round, especially through rounds 12-15 where the pattern becomes more intricate
- Use a stitch marker to mark your first stitch of each round if you tend to lose track
- Don’t panic if your square cups or puckers through the middle rounds; this is built into the pattern’s construction
- Work the picot stitches consistently by pushing each picot forward after completion for uniform texture
- If corners begin to curl, gentle blocking will resolve this
- Consider making a gauge square first if you’re substituting yarn to ensure your finished block reaches 12 inches
Pattern Variations
Experiment with different color combinations to create varied moods. Soft cream creates an heirloom vintage feel, while sage green or dusty rose adds subtle color without overwhelming the texture.
For a crochet flower mandala throw effect, work the center floral section in one color and the outer rounds in a coordinating shade.
Adjust hook size to create smaller squares for pillow covers or larger blocks for quick blankets. Remember that yarn weight changes will also affect final dimensions and yardage needs.
Common Problems and Troubleshooting
Problem: My square is cupping severely through the middle rounds.
Solution: This is expected behavior for this pattern. The cupping typically resolves by round 18 as the border rounds are added. Continue following the pattern and block lightly at the end.
Problem: My finished square measures smaller than 12 inches.
Solution: Your tension may be tighter than the pattern gauge, or your yarn may be slightly lighter than worsted weight. Try a larger hook size for future squares, or gently block your current square to stretch it to size.
Problem: I’m losing count in the corner sections of round 21.
Solution: Place stitch markers at each corner ch-2 space before beginning round 21. Work one complete corner slowly, then use that as your reference for the remaining three corners.
Problem: The picot stitches look inconsistent.
Solution: Make sure you’re pushing each picot forward after completing it. Consistent yarn tension on the chain portion of the picot also helps create uniform size.
How to Use Your Finished Squares
This elegant granny square pattern creates blocks perfect for:
- Heirloom-quality afghans and throw blankets
- Sampler blankets combining multiple intricate granny square designs
- Decorative pillow covers (one square front, solid fabric back)
- Wall hangings and textile art
- Special occasion gifts for weddings or anniversaries
- Memory blankets incorporating meaningful colors
Care Instructions
Hand wash your finished vintage floral square in cool water with mild detergent. Gently press out excess water without wringing or twisting, which can distort the textured stitches.
Lay flat to dry, reshaping to 12 inches square while damp. Store folded loosely in a cool, dry place away from direct sunlight to prevent fiber degradation over time.
Frequently Asked Questions
Can a confident beginner attempt this pattern?
While labeled intermediate to advanced, a motivated beginner comfortable with basic stitches and willing to learn post stitches and clusters can successfully complete this pattern. Take it slowly and count carefully.
What yarn works best for showing the texture?
Smooth worsted weight yarns with good stitch definition work best. Avoid highly variegated or self-striping yarns, as they obscure the intricate stitchwork.
Can I use a different hook size?
Yes, adjust your hook to match your tension and achieve the 12-inch finished size. Your hook may need to be larger or smaller than 5mm depending on your personal crocheting style.
How can I make this square larger or smaller?
To enlarge, add additional border rounds after round 22, maintaining the corner increases. To reduce size, stop at round 18 or 19 for a smaller decorative square.
Will this pattern work with bulky weight yarn?
The pattern can be adapted to bulky weight, but expect a significantly larger finished square and increased yardage. Swatch first to determine final dimensions.
How do I prevent the corners from curling after washing?
Light blocking after washing will restore the square shape. Pin corners firmly while damp and allow to dry completely before removing pins.
Can I join multiple squares without the border showing?
Yes, work a flat seam such as mattress stitch or whip stitch from the wrong side to create nearly invisible joins between squares.
Final Thoughts
The Vintage Floral Afghan Granny Square Free Crochet Pattern rewards patient crocheters with a stunning block full of dimensional texture and timeless elegance. Whether you’re building a sampler blanket or creating standalone heirloom pieces, this elegant granny square pattern delivers sophisticated results that showcase your skills beautifully.
Don’t hesitate to experiment with colors and yarn choices to make each square uniquely yours. The intricate granny square construction provides a satisfying challenge, and the finished result is a textured granny square crochet pattern you’ll be proud to display or gift.