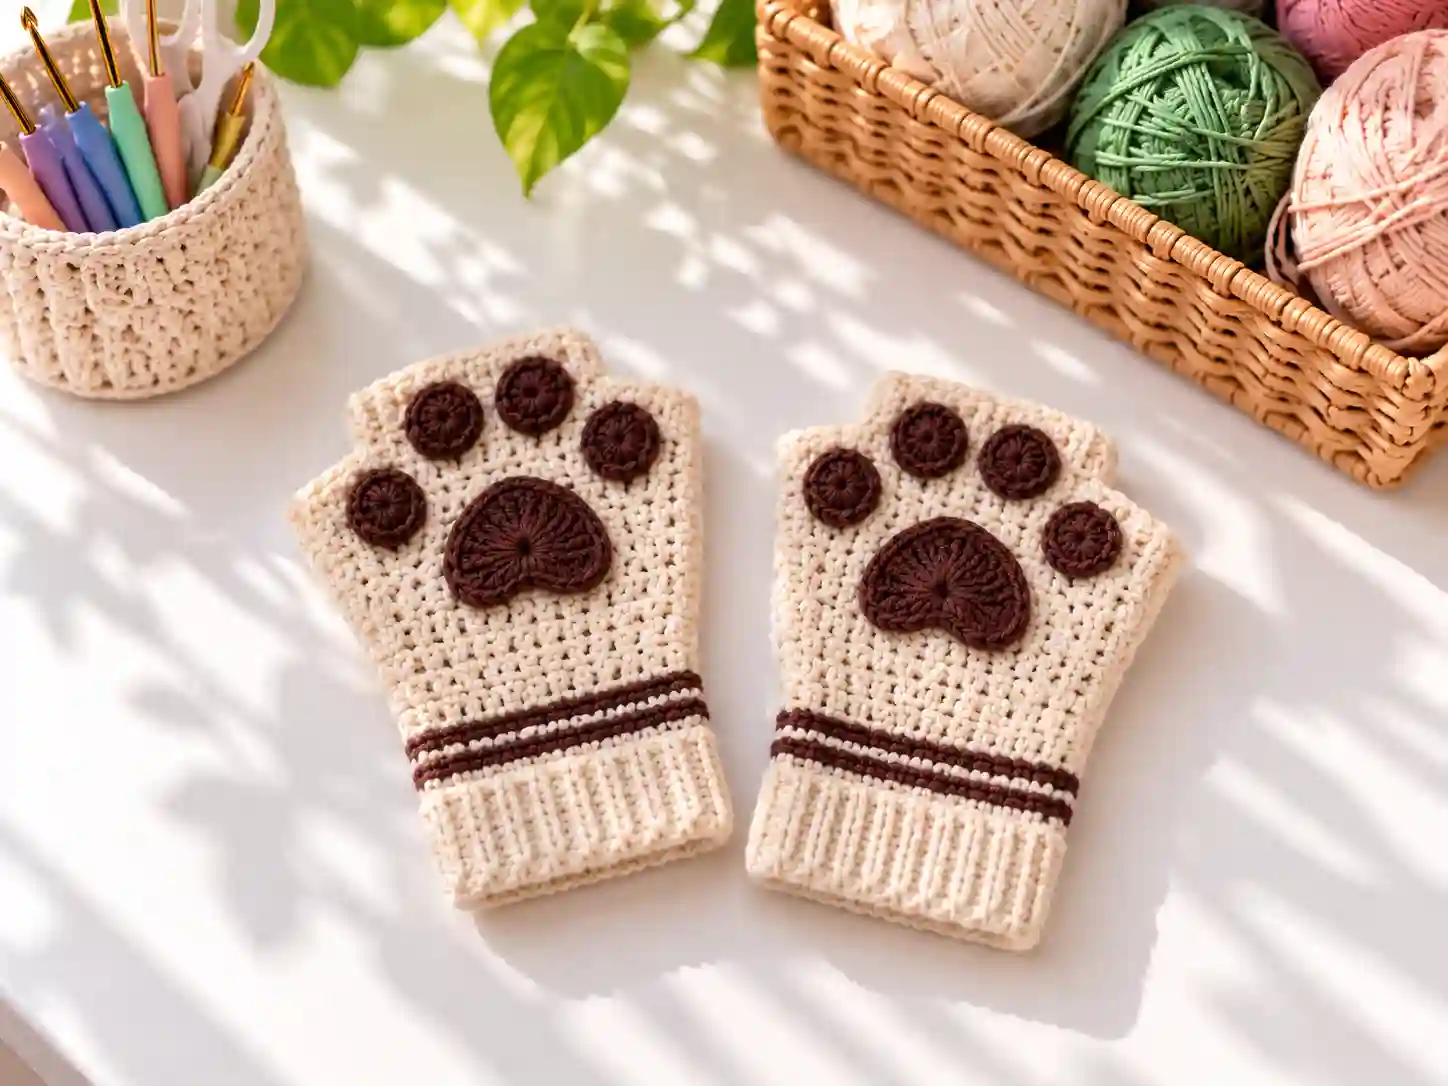
There is something undeniably delightful about accessories that combine practicality with personality. The Charming Crochet Cat Paw Fingerless Gloves to Warm Your Hands deliver exactly that. These fingerless gloves keep your palms and wrists cozy while leaving your fingers free for texting, crafting, or grabbing your morning coffee. The playful paw pad appliqués on the back of each hand add a whimsical touch that cat lovers and kawaii fashion fans will adore.
Whether you are looking for a quick weekend project, a thoughtful handmade gift, or a fun addition to your own winter wardrobe, this pattern fits the bill. The construction is straightforward enough for confident beginners, and the finished gloves work up quickly with basic stitches. You can customize the colors to match your style or whip up multiple pairs in different shades for everyone on your gift list.
Why You Will Love This Crochet Project
- Beginner-friendly construction using simple stitches
- Quick project that can be completed in a few hours
- Customizable colors for a personalized look
- Scrap-yarn friendly for the paw pad details
- Perfect handmade gift for cat lovers and teens
- Functional fingerless design for everyday wear
- Pairs beautifully with crochet cat ear hats for a full set
Finished Size
This pattern is written for an average adult woman’s hand, approximately 8 cm wide and 16 cm long from wrist to base of fingers. The gloves are designed with gentle stretch to accommodate a range of hand sizes. You can adjust the fit by changing yarn weight and hook size as described in the variations section.
Materials You Will Need
- 5-ply yarn in white or your chosen base color (approximately 80 to 100 yards per glove)
- Small amount of pink or contrasting yarn for paw pads
- 3.5 mm crochet hook for the main gloves
- 4 mm crochet hook for ribbing (optional, for tighter ribbing)
- Tapestry needle for weaving ends and sewing paw pads
- Scissors
- Stitch marker
- Optional: 4.5 mm hook if making a larger size
Yarn Information
The original design uses 5-ply cotton or cotton-blend yarn for the main gloves. This weight provides a good balance of warmth and flexibility without making the gloves too bulky. A small amount of contrasting yarn in pink or any color you prefer works beautifully for the paw pads.
If you substitute a different yarn weight, your finished gloves will be larger or smaller. Worsted weight yarn with a 4 mm hook creates a roomier fit suitable for larger hands. Lighter yarn with a smaller hook produces a more delicate, fitted glove. Always consider how yarn choice affects both size and drape.
Crochet Hook
Use a 3.5 mm crochet hook for the main body of the gloves. If you prefer tighter ribbing along the cuff, switch to a 4 mm hook for that section only. Adjust hook size based on your yarn choice and desired fit.
Crochet Abbreviations (US Terminology)
- ch: chain
- dc: double crochet
- sc: single crochet
- sl st: slip stitch
- st: stitch
- inc: increase (work 2 stitches into the same stitch)
- dc inc: double crochet increase
- hdc inc: half double crochet increase
- tc: treble crochet
- FLO: front loop only
- mr: magic ring
- inv join: invisible join
- fo: fasten off
Pattern Notes
- These gloves are worked flat in rows, then seamed to form a tube.
- The pattern uses US crochet terminology throughout.
- Turning chains do not count as stitches unless specified.
- Each glove is made separately, so you will repeat the entire pattern twice.
- Paw pads are crocheted separately and sewn onto the back of one glove before seaming.
- Ribbing is worked perpendicular to the glove body and attached along the wrist opening.
Crochet Pattern
Gloves (Make 2)
Row 1: Ch 16. Work 13 dc into the chain, starting from the second chain from the hook. Work 6 dc into the last chain. Turn your work and continue along the opposite side of the foundation chain. Work 13 dc along the opposite side. (32 sts)
Row 2: Turn. Ch 2 (does not count as a stitch). Work 13 dc across. Work (inc) 6 times across the curved end. Work 13 dc along the opposite side. (38 sts)
Row 3: Turn. Ch 2. Work 13 dc across. Work (dc, inc) 6 times across the curved end. Work 13 dc along the opposite side. (44 sts)
Row 4: Turn. Ch 2. Work 13 dc across. Work (inc, 2 dc) 6 times across the curved end. Work 13 dc along the opposite side. Fasten off. (50 sts)
Row 5 (Thumb Opening): With the right side facing you, insert your hook into the 14th stitch from the right bottom corner. Pull up a loop and work 1 sc. (Skip 1 st, work 6 dc into the next st, skip 1 st, work 1 sc) 5 times. Work 1 sl st. Fasten off. (36 sts along the top edge)
Row 6 (Top Edge): With the right side facing you, ch 2 (does not count as a stitch) in the right bottom stitch. Work 14 dc across the bottom edge. Work 1 sc into the thumb opening base. Work (2 dc, 2 dc inc, 2 dc, sc) 5 times along the scalloped edge. Work 15 dc along the remaining side. Fasten off and weave in ends. (74 sts total)
Paw Pads
Large Triangle Pad:
Round 1: Make a magic ring. Ch 2. Work 12 dc into the ring. Join with an invisible join. (12 sts)
Round 2: Ch 2. Work 12 inc (2 dc in each stitch). Join with an invisible join. (24 sts)
Round 3: Ch 2. Work 1 dc, 1 tc, 1 dc inc, 5 sl st, 1 sc, 1 hdc inc, 1 sc, 5 sl st, 1 dc inc, 1 tc, 1 dc. Ch 2. Work 5 sl st. Fasten off and join with an invisible join. (27 sts)
Small Circles (Make 5 per glove):
Make a magic ring. Work 10 hdc into the ring. Fasten off and join with an invisible join. (10 sts per circle)
Assembly
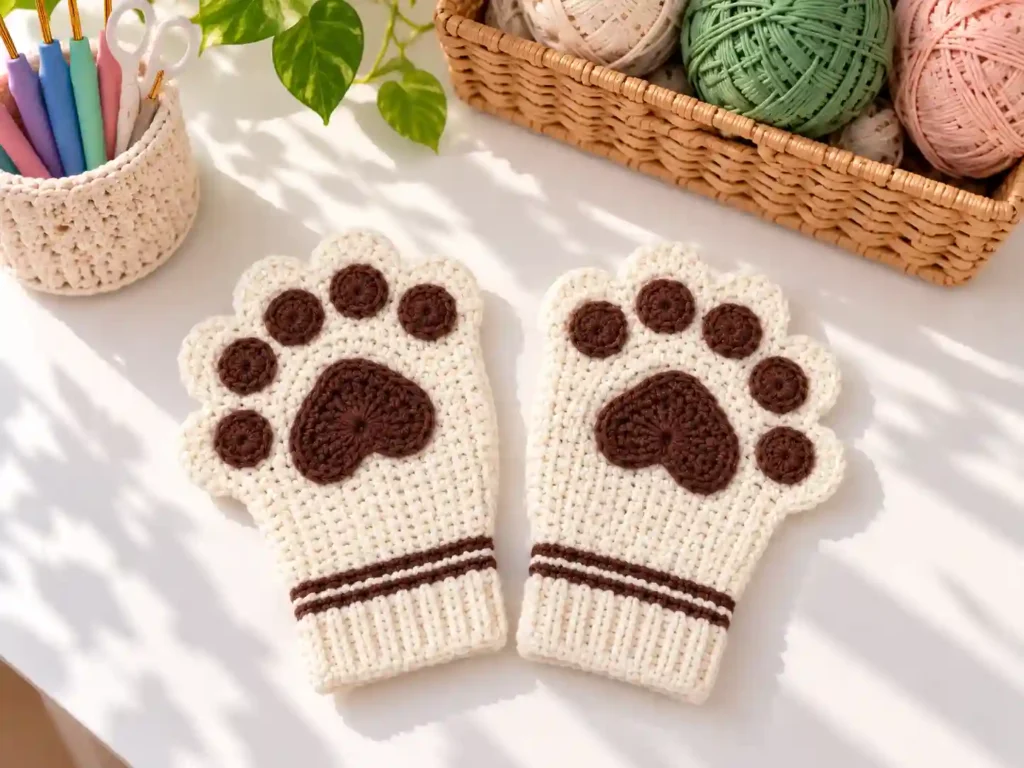
- Place the large triangle paw pad and five small circles onto the back of one glove in your desired arrangement. The triangle sits near the wrist, with the five smaller circles arranged above it like toe beans.
- Using your tapestry needle and contrasting yarn, sew each paw pad securely in place.
- Place the two glove pieces back to back, making sure the stitch counts align along the sides.
- Insert your hook into the right bottom stitch through both layers. Work 15 or 16 sl st along the side (depending on which side you started from).
- Work (8 sl st on the front piece only to create a scallop, then 1 sl st through both pieces) 5 times along the top edge to form the finger holes.
- Continue with sl st through both pieces along the remaining side.
- Work 2 sl st per dc along the bottom edge of the glove opening.
- Fasten off and join with an invisible join. The top view should show five finger holes created by the scalloped edge.
Ribbing (Make 2 per glove)
Note: For tight ribbing, work 3 sl st per repeat. For looser ribbing, work 2 sl st per repeat.
Row 1: Ch 6 in any stitch along the glove opening. Work 5 sc back along the chain. Skip 1 stitch at the base of the glove. Work 3 sl st into the glove.
Row 2: Turn your work. Work 5 sc in the front loop only. Ch 1. Turn your work. Work 5 sc in the front loop only. Skip 1 stitch at the base of the glove. Work 3 sl st into the glove.
Repeat Row 2 until you reach the first row of ribbing.
Finishing the Ribbing: Work sl st across the first row of ribbing to join the ends together. Fasten off and weave in ends.
Repeat the ribbing on the second glove.
Finishing Touches
Weave in all remaining ends securely on the inside of the gloves. If desired, lightly block the gloves to even out the stitches and improve the shape. Gently stretch the ribbing to ensure it has enough elasticity for comfortable wear.
Crochet Tips
- Maintain even tension throughout to ensure both gloves match in size.
- Count your stitches at the end of each row to avoid accidental increases or decreases.
- When working the thumb opening, mark the 14th stitch with a stitch marker to avoid losing your place.
- Use contrasting yarn for the paw pads to make them stand out, or match the base color for a subtle look.
- Try the glove on after seaming the sides but before adding ribbing to check the fit.
Variations
- Use worsted weight yarn and a 4 mm hook for larger hands or a roomier fit.
- Try 8-ply yarn with a 4 mm hook for a medium size, or 10-ply yarn with a 4.5 mm hook for a large size.
- Experiment with different base colors like gray, black, or pastel shades for a unique look.
- Add embroidered details like tiny claws or whiskers near the paw pads.
- Create seasonal versions with holiday colors for festive gifts.
- Make a matching set with crochet cat ear hats or scarves.
Common Problems and Troubleshooting
Problem: The gloves are curling at the edges.
Solution: This can happen if your tension is too tight. Try using a slightly larger hook or consciously relaxing your grip on the yarn. Blocking the finished gloves can also help flatten the edges.
Problem: The finished gloves are too small.
Solution: Check your yarn weight and hook size. Switching to a heavier yarn and larger hook will increase the overall size. You can also add more rows to the body before seaming to increase length.
Problem: The stitch count does not match at the end of a row.
Solution: Go back and recount from the beginning of the row. Mark the first and last stitches of each row with stitch markers to keep track. The curved end with increases is where mistakes most often occur.
Problem: The ribbing is too tight and hard to pull over the hand.
Solution: Use a larger hook for the ribbing section or reduce the number of slip stitches per repeat. You can also work the ribbing with slightly looser tension.
How to Use the Finished Crochet Project
- Wear as everyday winter accessories to keep your hands warm while maintaining finger dexterity
- Give as handmade gifts for cat lovers, teens, or friends who appreciate kawaii fashion
- Pair with matching crochet cat ear hats for a complete costume or cosplay look
- Use as photo props for social media or product photography with a cute aesthetic
- Create multiple pairs in different colors for gift baskets or holiday presents
- Wear while crafting, texting, or driving in cold weather for practical warmth
Care Instructions
Hand wash the gloves in cool water with mild detergent. Gently squeeze out excess water without wringing. Lay flat to dry on a clean towel, reshaping as needed. Avoid tumble drying, as this can cause shrinkage or distortion. Store the gloves folded or rolled in a dry place away from direct sunlight.
Frequently Asked Questions
Can a beginner make this pattern?
Yes, this pattern is suitable for confident beginners who know basic stitches like chain, single crochet, and double crochet. The instructions are written step by step with stitch counts provided.
What yarn works best for these gloves?
A 5-ply cotton or cotton-blend yarn works beautifully for the original size. You can also use worsted weight yarn for a larger, warmer glove.
Can I use a different hook size?
Absolutely. Changing your hook size will affect the finished dimensions. A larger hook creates a roomier fit, while a smaller hook produces a tighter, more fitted glove.
Can I make the gloves larger or smaller?
Yes, adjust the yarn weight and hook size as described in the variations section. You can also add or remove rows to change the length.
Can I use a different yarn weight?
Yes, the pattern is adaptable to different yarn weights. Just be aware that changing yarn weight will change the finished size and yardage requirements.
How do I prevent the piece from curling?
Maintain even tension and avoid working too tightly. Blocking the finished gloves can also help flatten any curling edges.
How should I wash the finished gloves?
Hand wash in cool water with mild detergent and lay flat to dry. Avoid machine washing or tumble drying to preserve the shape and texture.
Conclusion
These Charming Crochet Cat Paw Fingerless Gloves to Warm Your Hands are a delightful blend of function and fun. With their quick construction, customizable colors, and adorable paw pad details, they make a perfect project for crocheters of various skill levels. Grab your hook, choose your favorite yarn colors, and create a pair (or two) of these cozy cat-inspired accessories today.